Resource Name Identifiersthat are used by applications and referenced within the J2EE Server. The J2EE Server securely holds details for the database connection or endpoint URLs, which are set-up by System Administrators. This means that the web application developer does not need to be aware of the specific details for deployment and publication environments. This also means that web applications can easily be published to each test, user acceptance or production environments without the need to change the location and security details because they are held on the J2EE Application Servers. The resource reference name must match the resource name specified in the application server container definition. The same resource name would be defined in each J2EE Application Server, but with different environment details. This makes the resource available to your application, but you need to configure the details of the connection in your J2EE application server.
JNDI - Web Application Configuration
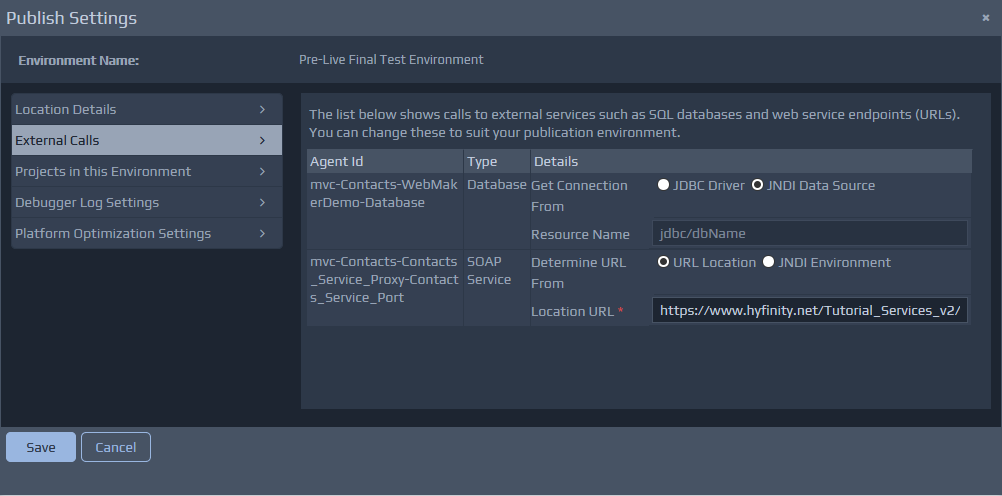
Once the JNDI Resource names are set-up in the Publication screens, the next step is to add an entry to the application's web.xml. If this is the first time this is being performed, it may be necessary to set-up a file with the relevant details. The first thing that needs to be considered is the method of publication that will be used. There are some options that need configuration details to be defined in the web application, and others that require configuration on a server. For the publication process to create a WAR file, or publish directly to Apache Tomcat, it is necessary to configure the web.xml within the application. For all other publication locations, the remote server requires manual configuration of the details below.
JNDI - Tomcat and WAR Configuration
At this point in time, the file system needs to be accessed directly to setup these details. Start a Windows Explorer window for the following location: {installation directory}\design\repository\{MyWorkspace}\mvc\{MyProject}\webapp. If there isn't a directory called
WEB-INFunder the
webappdirectory, then create the directory. Once created, it is necessary to add a
web.xmlfile within the newly created directory. To ensure that the file is created with the basic details required, please visit the following directory in another Windows Explorer window:
{installation directory}\runtime\tomcat-runtime\webapps\{YourProject}\WEB-INF. Copy the
web.xmlfile from the runtime location into the design repository location first visited above. Now select the file for edit in the design repository. Once the file is open you will need to insert the XML fragment below, and then change the values to your required JNDI settings. Insert the XML fragment below just before the closing
</web-app>element. The relevant resource details appropriate to your environment should be provided by your System Administrator. Once completed, save the file. You may need to repeat these steps if there are a number of JNDI resources that you need for your web application. The following fragment applies for Database Resources within the web.xml file:
<resource-ref>
    <description>My DB Connection</description>
    <res-ref-name>jdbc/myDBnameInTheContainer</res-ref-name>
    <res-type>javax.sql.DataSource</res-type>
    <res-auth>Container</res-auth>
</resource-ref>
The following fragment applies for Web Service Resource details within the web.xml file:
<env-entry>
    <env-entry-name>serviceURL</env-entry-name>
    <env-entry-value>http://www.hyfinity.net/Tutorial_Services_v2/Contacts_Service</env-entry-value>
    <env-entry-type>java.lang.String</env-entry-type>
</env-entry>
Note: The env-entry-valuewill likely be the URL that was defined for the local test deployment. The value above is simply an example, but your value will point to a remote service URL. In practice, this value will be overridden in the following steps based on the specific requirements for set-up depending on the J2EE Application Server you are going to use for your published application. Note: For BizFlow WebMaker applications the
web.xmldetails will need to be set-up on the BizFlow Server. The server configuration is shared by all projects deployed to the server, which means the
web.xmlwill likely already exist on the server. The file should be edited and the additional details added. As the server is shared, it is likely that careful coordination will be required with the System Administrator. However, it is also possible that as many Resource definitions are shared, that the details will likely not need to be set-up for every application to be published.
JNDI - Server set-up of Database Resources
The method to set-up database resource details will vary depending on the application server being used, but as an example, for Apache Tomcat, you can add a Resource entry to the context.xml configuration file, e.g:
<Resource name="jdbc/myDBnameInTheContainer" auth="Container"
        jndi-name="jdbc/myDB"
        type="javax.sql.DataSource"
               maxActive="100" maxIdle="30" maxWait="10000"
               username="uid..." password="pwd..."
        driverClassName="com.driver..."
               url="jdbc connection url..."
               defaultAutoCommit="false"/>
Note: If the application server container has not been configured for JNDI previously, and you are planning to use a Database Connection, then it may be necessary to place the required SQL JAR into the main libdirectory, e.g. for Apache Tomcat 7 the directory might be:
C:\Program Files\Apache Software Foundation\Tomcat 7.0\lib. The SQL JAR will depend on the Databases used by the web applications.
JNDI - Server set-up of Web Service Resources
The method to set-up web service resource details will vary depending on the application server being used, but as an example, for Apache Tomcat, you can add a Resource entry to the context.xml configuration file, which should be located in the confdirectory of the Tomcat installation. Edit the file and add the following xml fragment prior to the
</Context>closing element. Then change the value to the required URL.
<Environment name="serviceURL" value="http://www.hyfinity.net/Tutorial_Services_v2/Contacts_Service" type="java.lang.String" override="false"/>